After a few days of playing around with Docker. I think my experience on this platform would be somewhat useful to share.
This serve as a guide into running simple Docker containers. It’s not a comprehensive guide but rather a detailed one.
What is Docker?
Docker is an open-source platform designed to automate the deployment, scaling and management of applications in lightweight Containers - a form of virtualization that allows the packaging of an application along with all of its dependencies into a single package that can run seamlessly across machines with different hardware configurations.
Why Docker?
I personally find these to be the biggest benefits when using Docker.
- Consistent Environment: Using containers, Docker ensures that if an application works on the development machine, it can work the same way in other machines. Help avoiding the classic situation “But…It worked on my machine!”.
- Compared to Virtual Machines (VM): Docker containers are much more lightweight and easy to manage than VMs because they somewhat represent a stripped down version of a VM while sharing the host OS kernel instead of using their own, mitigating the overhead.
- Version control and rollbacks: Docker images can be versioned, allowing developers to track changes and roll back to previous versions if something goes wrong.
Some situations you can use Docker
- Development environment consistency: let’s say you’re working on a group project that requires specific versions of programming languages, databases or other dependencies. Instead of installing everything directly on your system, you can use Docker to create a consistent environment that can be reproduced and shared with others effortlessly. It prevents “works on my machine” issues.
- Playing around with new technologies: You want to try out a new batabase, web server or a python module. Instead of installing it directly on your system, you can test it out in a Docker container. This avoids cluttering your system with new software that you’re not sure if you would ever need again, and allows for easy cleanup after finish experimenting.
- Running multiple projects without conflicting dependencies: You have two different projects that require different versions of Python. Docker can wrap them up in their own environment and neither will conflict with each other.
The Architecture
In order to run a basic application inside a Docker container, 3 of these concepts are involved:

- Dockerfile - the blueprint that tells Docker how to handle you applications, including installing dependencies and configure its behaviour.
- Docker image - the executable package, built from Dockerfile that contains everything your application need to get runnning.
- Docker container - the runtime instance, when you run the Docker image, it creates a container, which is the actual environment where your application runs.
Additionally:
-
Docker Registry is a service that stores Docker Images. Docker Hub is the default public registry, but you can also set up private registries for internal use.
-
Docker Compose is a tool for defining and running multi-container Docker applications. With Compose, you use a YAML file to configure your application’s services and behaviours. Then, with a single command, you create and start all the services from your configuration.
How it works
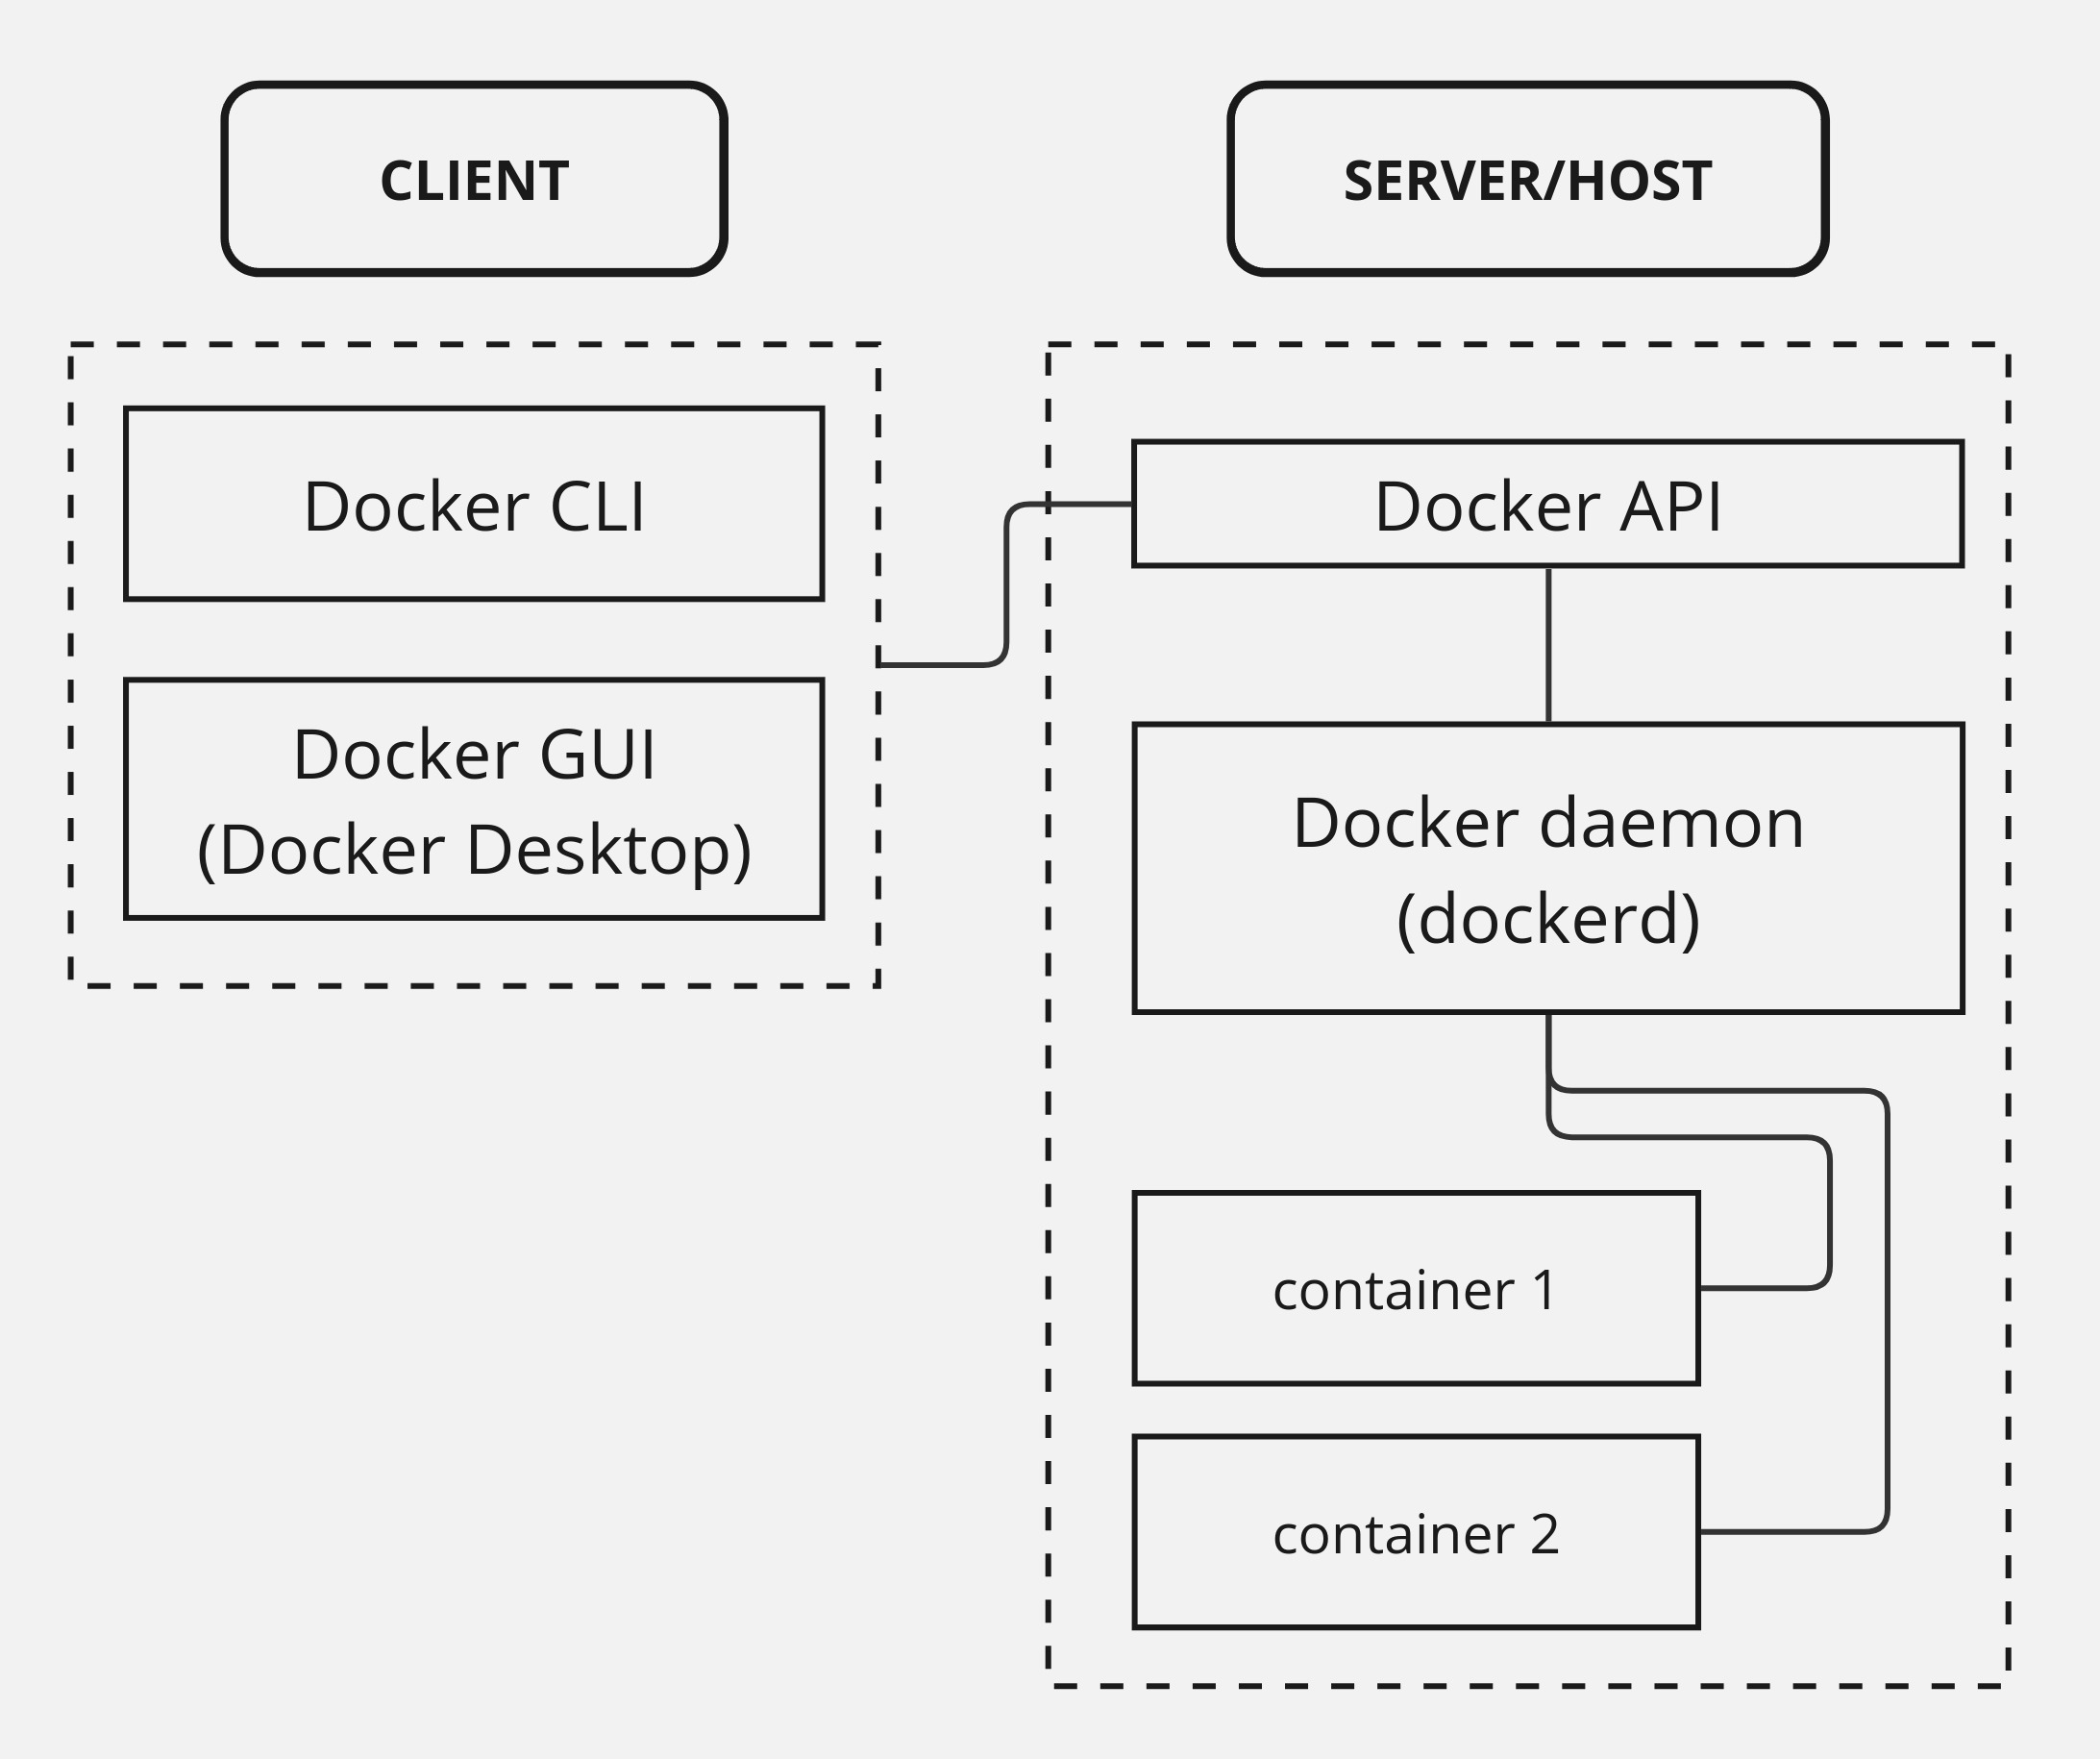
Docker uses a client-server architecture. The Docker client talks to the Docker daemon, which does the heavy lifting of building, running, and distributing your Docker containers.

Client side
- User interacts with Docker CLI or Docker Desktop, were they can build, run, and manage Docker containers.
Server side
- Commands from Client side will be received and processed by Docker API, which is a RESTful API that provides a way for clients to communicate with the Docker Daemon - a running service of Docker, goes by the name of
dockerd. - Docker Daemon is responsible for creating, running, and managing Docker containers.
Start Docking
We will learn how to dockerize a simple python program and deploy its container.
Create a structural directory for building Docker image
Below serves as a simple file organization for Docker to build from your source.
application_name/
├── Dockerfile
├── requirements.txt
└── source.py
In which:
- Dockerfile: It contains instructions for Docker engine to start installing dependencies and building your containers.
- The file name is mandatory and case sensitive, make sure to create the file with the exact name, or else Docker won’t recognize it as a Dockerfile.
- requirements.txt: is a simple text file listing the names of required Python libraries.
- source.py: contains the source code for your Python application.
[source.py] Putting code into your Python application
You can use your own code and libraries, or use this sample code:
|
|
- Import Matrix and pprint from sympy to convert a 2D array into matrix and print it.
- Define the function
multiplyMatrix(). - Create a
matrixobject which holds the value of 2 matrices multiplied with each other. - Use
pprint()to print out the matrix into the console.
[requirements.txt] List your application’s dependencies
From the above python script, sympy is required to run the program.
In order for Docker to install dependencies, we need to put the names of those libraries into requirements.txt:
sympy
Simple as that, we have included everything our script need to run.
In Python, installing multiple libraries can be done by using
pipon a text file that lists the included libraries, each sitting on their own line.
[Dockerfile] Configure Dockerfile behaviour
Now that we have setup everything. It’s time to configure how Docker will build your application into an image.
FROM python:latest

WORKDIR /app

COPY requirements.txt .

RUN pip install --no-cache-dir -r requirements.txt

COPY . .

CMD ["python", "source.py"]
FROM: specifies the base image to build upon. In this case, we use the latest Python image.- This line will pull the latest Python image from Docker Hub to build everything else.
- The base image is the starting point for the Dockerfile. It can be any image available on Docker Hub or a custom image you have created.
WORKDIR: sets the working directory inside the container. By default, we use/app.COPY: copies files from the host machine to the container. We copyrequirements.txtto the working directory.RUN: executes a command inside the container. Here, we install the dependencies listed inrequirements.txtby using Python’s package managerpip.COPY . .: copies the rest of the files from the host machine to the container.CMD: specifies the command to run when the container starts. In this case, we run the Python scriptsource.py.
Building Docker image
After setting up the Dockerfile, we can now build the Docker image.
Your terminal location must be in the same directory where the file
Dockerfileis located so Docker engine can detect that file and executing the process.
docker build -t <image_name>:<tag> .
-t <image_name>:<tag>: This flags tags the image with a name and an optional tag. The tag is used to differentiate between different versions of the same image. If not specified, Docker will default tolatest..: specifies the build context. Docker will look for the Dockerfile in the current directory.
Additionally, you can add --no-cache to the build command to force Docker to rebuild the image from scratch if the previously built image is broken during the process. If not specified, Docker will reuse the cache to speed up the build process.
Example:
docker build -t matrix-multiplication:1.0 --no-cache .
Once the build is complete, you can verify that the image has been created by listing all Docker images:
docker images
The result should be similar to this:
> docker images
REPOSITORY              TAG       IMAGE ID       CREATED          SIZE
matrix-multiplication   1.0       7565e3e77b8a   11 seconds ago   1.1GB
Deploying a Container from the built Image
To deploy the newly built image, simply use docker run command:
docker run <image_name>
You can replace <image_name> with <image_id> which is the ID of the image listed in docker images command.
Example:
docker run matrix-multiplication
You can also choose to run a specific version of your image by adding <tag> to the image name, similar to the build command.
To see which container is running, use:
docker ps
Or to see all containers created, including those that have stopped, use:
docker ps -a
Docker Container Data
Due to Docker containers being ephemeral, which mean they are designed to be disposable, data created withing the process of running will be delete after a container ends its cycle.
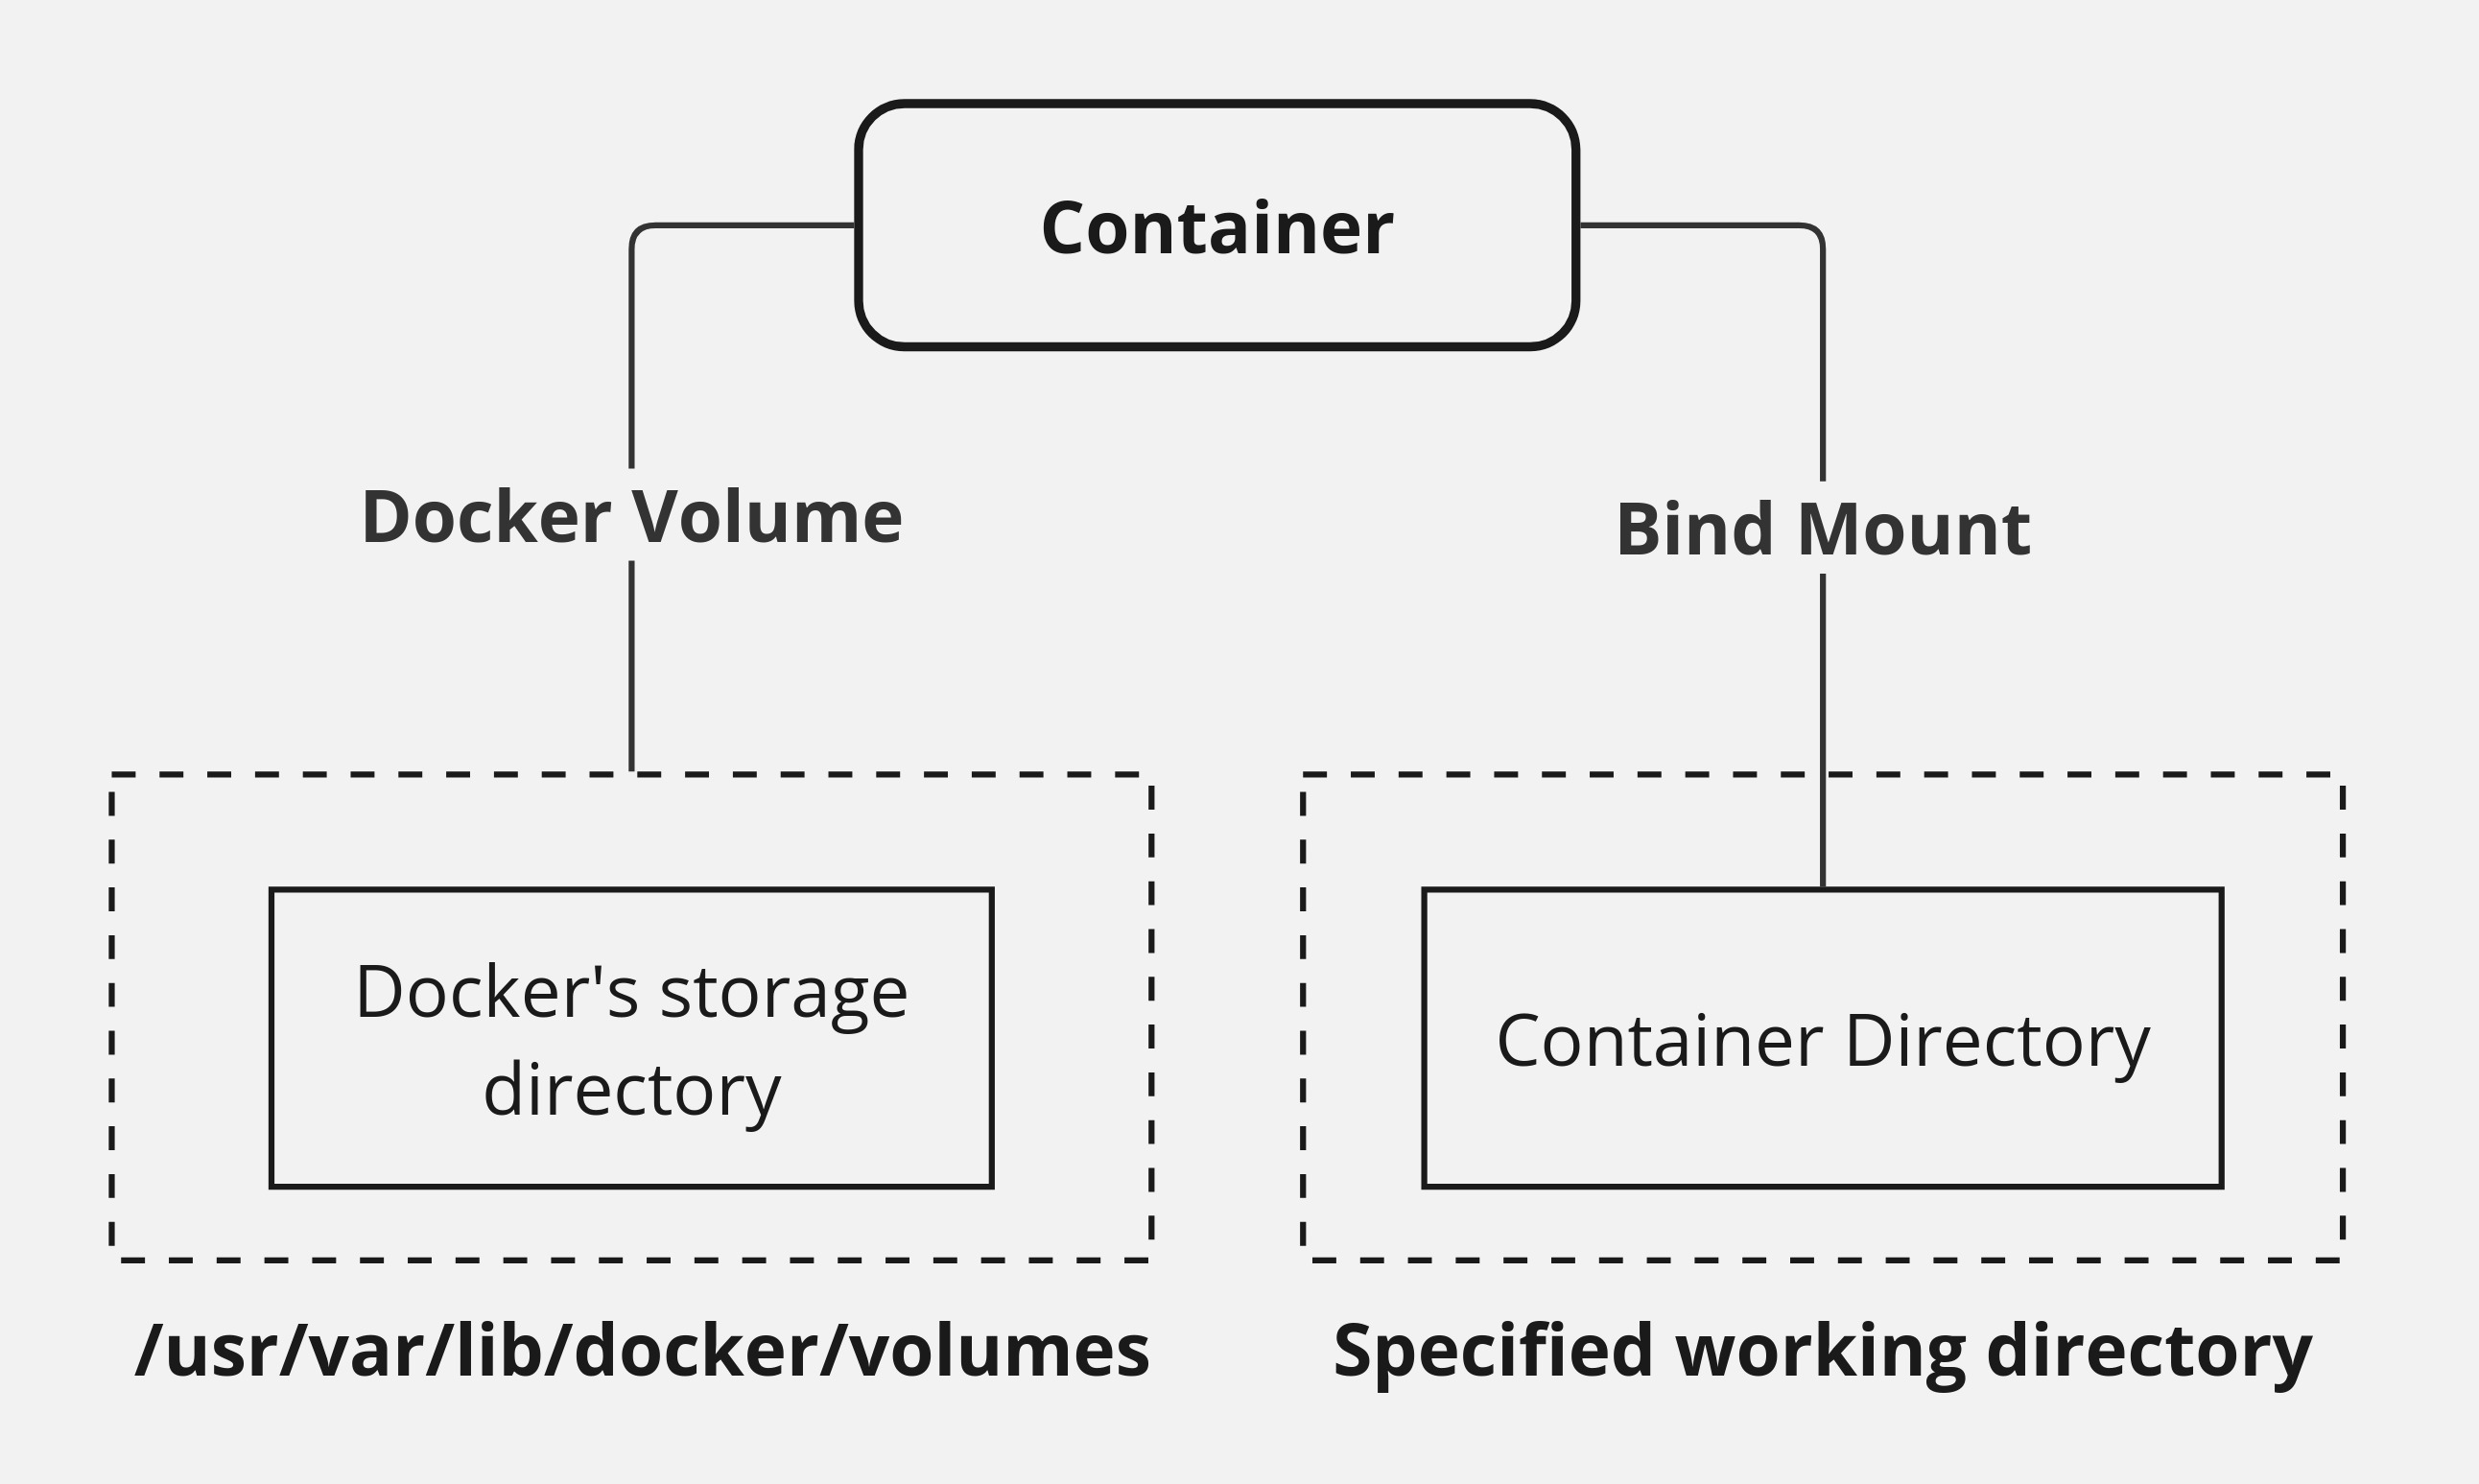
There will be situations where you need data persistence. In order to do so, a Docker container has 2 ways to mount its working directory to the host machine’s filesystem: Bind Mount and Docker Volume.

The differences
It may seems like both methods serve the same purpose, but there are some differences between them:
| Feature | Bind Mount | Docker Volume |
|---|---|---|
| Binding method | Links a directory in the container to specified directory on the host machine | Links a directory in the container to a Docker Volume (in Linux, they are usually located at /var/lib/docker/volumes/) |
| Data Persistence | Data is stored in the host machine’s filesystem | Data is stored in the Docker Volume |
| Security | Less secure as it can access the host machine’s filesystem, any changes made to the container directory will be seen directly on the filesystem | More secure as it is abstracted away from the host machine’s filesystem |
| Use case | Useful for development purpose as binded data can be modified outside of the container | Useful for production purpose as it is more secure and isolated |
To create a Docker Volume, you can use the command:
docker volume create <volume_name>
To see created Volumes, use:
docker volume ls
To see info about a Volume, use:
docker volume inspect <volume_name>
To remove a volume, use:
docker volume rm <volume_name>
More Docker commands
-
docker start <container_id>: starts a stopped container. You can find the container ID by usingdocker ps. -
docker stop <container_id>: stops a running container. -
docker attach <container_id>: attaches your terminal to a running container. -
docker rm <container_id>: removes a container from your local machine. -
docker rmi <image_name>ordocker rmi <image_id>: removes an image from your local machine.
More docker run tags
-
-d: enables docker to run in detach mode, meaning the container will run in the background. This is useful for running services or applications that you want to keep running in the background while continue to use your terminal. -
--name <container_name>: assign a name of choice to the container. -
-p <host_port>:<container_port>: maps a port from the host machine to the container. This is useful when you want to access a service running inside the container from the host machine.- Example:
-p 8080:80maps port 8080 on the host to port 80 in the container.
- Example:
-
--rm: Automatically removes the container when it exits. Useful for running short-lived containers. -
-it: combines 2 flags:-i(interactive): keeps STDIN open even if not attached to the container. Useful for interacting with a container in real time, such as entering commands or running a shell inside the container.-t(TTY): allocates a pseudo-TTY (a terminal interface). This makes the container behave like a terminal session, allowing you to interact with it as if it were a CLI(command line interface).- Combining
-iand-tallows you to run a container in interactive mode with a TTY. It’s equivalent to saying “keep the input open (-i) and give me a terminal interface (-t)”.
-
-v <host_path>:<container_path>: mounts a volume from the host machine to the container.- Example:
-v /path/on/host:/path/on/containermounts the/path/on/hostdirectory on the host to the/path/on/containerdirectory in the container.
- Example:
